« Previous
Next »
 You can modify the comment by using below steps:
 Step (3): You can select a required picture using Insert Picture dialog box. When you will click Insert button, selected picture will be inserted in your worksheet. You can play with your inserted picture in different ways, like you can apply quick styles to your picture, you can resize it, or you can change its color. To try it, just double click your inserted image and Excel will give you numerous options available under Format menu to format your inserted graphics.
« Previous
Next »
MICROSOFT EXCEL 2013
TEXT BOXES
Text boxes are special graphic objects that combine text with a rectangular graphic object. Text boxes and cell comment are similar in that they display text in rectangular box text boxes are always visible while cell comment become visible after selecting cell.
Adding text boxes
- Choose insert>>Text Box>> Choose text box or draw it.
- After you dragging text box you can enter text by typing.
Formatting Text Box
After you added text box, you can format text box by changing the font, font size, font style, and alignment, etc. Let us see some of the important options there.
- Fill: Specifies filling of text box like No fill, solid fill. Also specifying transparency of text box fill.
- Line Color: Specifies the line color and transparency of the line.
- Line Style: Specifies line style and width.
- Size: Specifies the size of the text box.
- Properties: Specifies some properties of text box.
- Text Box: Specifies text box layout, Auto-fit option and internal margins.
ADDING COMMENT TO CELL
Adding comment to cell helps in understanding the purpose of cell, what input it should have, etc. It helps in proper documentation.
- Select the cell or cell range to add comment.
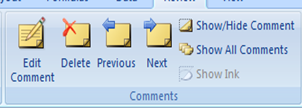
- Choose Review » Comments » New Comment or
- Right-click the cell and choose Insert Comment from available options. or Press Shift+F2
- Type the comment line in text box.
Editing comment
 You can modify the comment by using below steps:
- Select the cell on which comment appears.
- Right-click the cell and choose Edit Comment from available options.
- Modify the comment
Deleting comment
Select the comment to be deleted and click on delete option from comments group of review tab.ADDING PICTURE IN DOCUMENT
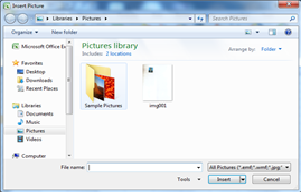
You can beautify your Microsoft Excel worksheet by inserting a variety of graphics. Following are the simple steps to add an existing picture in your worksheet. It is assumed that you already have a picture available on your PC before you add this picture in your Excel worksheet. Step (1): Click in your worksheet where you want to add a picture. Step (2): Click the Insert Menu and then click Picture option available in illustrations group, which will display Insert Picture dialog box. Step (3): You can select a required picture using Insert Picture dialog box. When you will click Insert button, selected picture will be inserted in your worksheet. You can play with your inserted picture in different ways, like you can apply quick styles to your picture, you can resize it, or you can change its color. To try it, just double click your inserted image and Excel will give you numerous options available under Format menu to format your inserted graphics.
CLIP ART
It is another feature of MS Excel to adding graphics into you document. Many predefined Clip Art with different categories are available.- For adding clip art first place the cursor where you want to add.
- Click on Clip Art button from Illustrations group of insert Menu.
- When you click, a Clip Art dialog box will appear at right of your document.
- Type the category/ clip art name in search for text box.
- Click on Go button
- Your needed picture will appear on the dialog box and click on picture to add into you document.
Adding WordArt in Worksheet:
Word Art provides a way to add fancy words in your Excel worksheet. You can add your text in a variety of ways.- Click the Insert tab and then click WordArt option available in Text group, which will display a gallery of WordArt
- You can select any of the WordArt style from the displayed gallery by clicking on it.
- The sample WordArt text “Your Text Here” will appear, then type your text.
- You can also modify the inserted text as per your requirement and you can make it further beautiful by using different options available. To try it, just click your inserted WordArt and Excel will give you numerous options available from Format menu to format your text.

Adding Shapes in Worksheet:
Shapes provide you to insert readymade rectangle and circles, arrows, Lines, Equation Shapes, Star and Banners, and callouts.- Click on Insert Tab.
- Click on Shapes button from illustration group.
- Click on a shape which you want from drop down list as illustrated right.
- Dag the mouse pointer to draw shapes.
